Forum
Market
- Colt 1851 Navy
- Martini-Henry
- 38-55 Støpeblokk
- Dansk modell 1841 Løbnitz kammerladerkarabin
- Kuletenger 580/ 585 minie og 690 rund
- orginale 12,17 x 44 R hylser
- Pietta Starr Single-Action perk. revolver
On this day
24 July 1701
Fort Pontchartrain du Détroit, also known as Fort Détroit, was established by the French officer Antoine Laumet de La Mothe in 1701. The site of the old fort is now within the city of Detroit in the American state of Michigan.
Fort Détroit was established
Fort Pontchartrain du Détroit, also known as Fort Détroit, was established by the French officer Antoine Laumet de La Mothe in 1701. The site of the old fort is now within the city of Detroit in the American state of Michigan.

Featured article

Norway’s first military revolver was a pinfire revolver invented by the Frenchman Eugène Lefaucheux in the 1850s. Read this article to learn how to shoot the Lefaucheux revolver.
Shooting the 11mm Lefaucheux revolver
Making a Target or Carrying Sling
 About
AboutPublished: 14 September 2008 by Øyvind Flatnes.
Edited: 14 September 2008.
Views: 15771
 Les artikkel på norsk
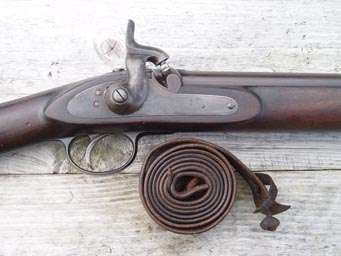
Most old military longarms had sling swivels, but their original leather slings are usually long gone. Replica firearms are rarely sold with slings, but making a sling that fits you and your musket or rifle is pretty simple. This article shows you how to do it.
This sling in this article is a copy of the Norwegian military sling that was used on the old Norwegian kammerlader rifles and the Remington rolling block rifles. You don't need any buckles or other metal objects; the sling is made entirely of leather. The sling which serves as an example is used as an example is made for an original P-1856 Enfield rifle musket, and has the following measurements:
- 3 mm (.118") thick
- 135 cm (53") long
- 30-35 mm (1.38") wide
The Enfield sling pictured here was supposed to be a target sling and not a carrying sling, and that's why it is as long as 135 cm. I bought the sling from an acquaintance which is a shoemaker by profession, and it cost me 60 Norwegian crowns. The leather was uncoloured, but leather is easily coloured with any leather dye. You can get the dyes in a number of different colours. The colour I chose was dark brown.
Remember, if you pre-order a leather sling you must measure the sling swivels on the weapon you are going to use it for. The length must also be considered. On my Enfield there is a rather long distance between the two sling swivels, and that calls for a long sling. For most other firearms the sling could have been shorter.
The finished sling in action:How to make the sling
Punching the holes.
On the bottom part of the sling the holes are positioned a bit differently. You should have four holes here as well, but they should be positioned in the centre of the sling (see picture).
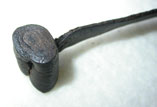
The template that is used to make the leather button, and a drawing that shows how it is made. To the right is a picture of a finished button.
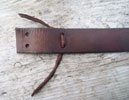
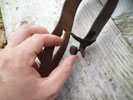
The hardest part is probably to make the leather button which is used to adjust the length of the sling. The button is made from a thinner piece of leather as shown in the drawing. Start with the wide end and roll the piece together. When you have rolled the wide end you punch a hole with a sharp object through the roll and thread the thin end through the hole. Afterwards you tighten it securely. Making the button may require some training, but it is not impossible to make.
Then the button must be attached to the sling where you made the four centre-lined holes. The arrows in the drawing show you how to begin the threading. The most important thing is to fasten the end of the leather sling to prevent the button from sliding out. On the other end of the sling it is simpler with only one single leather strap to be attached.
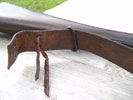
The drawing shows you how to thread the button to the bottom part of the sling, and the leather strap in the other end of the sling. The pictures shows the button and leather strap installed.
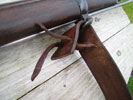
The only thing remaining is to make holes for adjusting the length of the sling. On old military slings you usually find two holes: one for rolling up the sling entirely on the weapon and one for using the sling as a carrying sling.
If you are going to use the sling as a target sling you can make holes to suit your own needs and shooting position. It is quite easy: Punch one hole in the centre of the sling, and then cut a slash from the hole with a sharp knife. The slash allows you to stick the leather button into the sling. You can have many such holes, depending on what shooting position you use.
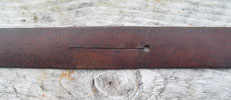
This is how the hole used for adjusting the sling looks like.
Mounting the sling on your firearm
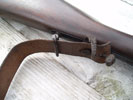
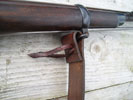
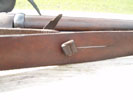
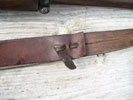
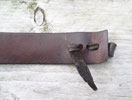
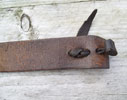
The pictures shows you how to mount the sling on your firearm. Start by threading the upper part of the sling through the lower sling swivel and drag the sling through the sling until it stops in the leather button. The sling is to have the 'outside' against the stock. Thereafter you thread the sling through the upper sling swivel and secure it. Finally you adjust the length by selecting one of the holes you have made.
Find out more!
You can learn more about the use of percussion target rifles and muskets in the brand new book From Musket to Metallic Cartridge: A Practical History of Black Powder Firearms.