Forum
Market
- Colt 1851 Navy
- Martini-Henry
- 38-55 Støpeblokk
- Dansk modell 1841 Løbnitz kammerladerkarabin
- Kuletenger 580/ 585 minie og 690 rund
- orginale 12,17 x 44 R hylser
- Pietta Starr Single-Action perk. revolver
On this day
22 July 1298
The Battle of Falkirk was a battle in the Scottish War of Independence.
Battle of Falkirk
The Battle of Falkirk was a battle in the Scottish War of Independence.
Featured article
Norway was one of the first countries in the world, perhaps even the first, which adopted a repeating bolt action rifle for the armed forces. The rifle was invented by the Norwegian engineer J. S. Jarmann, and was adopted in 1884. The rifle was modern in 1884, but already obsolete in 1894. This is the story of the Jarmann rifle.
The Jarmann rifle - Part 1 - Background history
Home-Made Hammer Swaged Bullets
 About
AboutPublished: 19 September 2008 by Øyvind Flatnes.
Edited: 19 September 2008.
Views: 41576
 Les artikkel på norsk


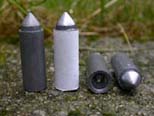
Hammer swage and bullets.
During the latter part of the 1800s many competitive muzzleloading shooters used so called 'hammer swages' which was a die where the bullets were swaged by the force of a hammer. The muzzleloading schuetzen rifles that used such bullets often had a false muzzle to facilitate the loading of the heavy paper patched slugs. A hammer swage is not difficult to make if you have access to a lathe. Swaged bullets normally don't have grease grooves and are best suited for paper patching.
My attempt to make a prototype of a hammer swage was actually quite successful. The swage is made up from three parts: a steel cylinder which is bored exactly to the diameter of the finished bullet, a bolt that forms the bullet base and a bolt that forms the bullet nose. The tool is simple to use. A lead slug with a light coating of RCBS case lube is inserted into the cylinder. The nose forming bolt is inserted in one end of the cylinder and the base forming bolt into the other. The bullet is formed with a couple of hard blows from a hammer against the base forming bolt. That's it, and the finished bullet can be removed from the cylinder.
Find out more!
You can learn more casting and swaging bullets for black powder guns in the brand new book From Musket to Metallic Cartridge: A Practical History of Black Powder Firearms.


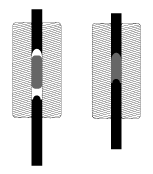
Hammer swaging process.
The nose of my prototype bullet looks ridiculous, but it only meant as a just a test. To say the least, it is not very aerodynamic! I have now modified the nose so that it looks a bit better, and it actually shoots ok in the Martini-Henry. The advantage of a hammer swage like this is the opportunity to make a number of different nose and base forming bolts. The length can also be varied until you have a bullet that is optimal for your rifle. To change the diameter of the bullet you need to make a new cylinder.
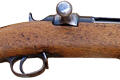
The disadvantage of swaged bullets is the production time. First you must make the lead slug from which the bullet is swaged. If you have access to lead wire you will save some time, but at least here in Norway, lead wire is not readily available. On the other hand it is simple to cast a couple of hundred slugs that can be used to swage bullets in a number of different calibres. If you simply want to experiment with a few bullets it takes less time to swage them compared to start melting lead, wait for it to heat, heat the moulds and cast a couple of bullets. I have tested the bullets briefly, and you can see the results in the article about the .577/.450 Martini.Henry rifles.
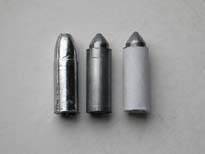

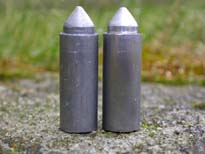
From left to right: A basis bullet, a finished bullet from the hammer swage and a paper patched bullet from the hammer swage. Picture 2: Bullet nose and cup base. Picture 3: Two swaged lead bullets. Finally, a cut away drawing of hammer swage.