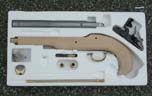
The kit.
Cheap Spanish and Italian replica flintlock firearms have a rather poor reputation among serious black powder shooters. The frizzens are not properly hardened which results in little or no sparks, which again leads to misfires. And, if there is ignition the ignition time is slow. Flintlock shooters should be familiar with the 'scrape - swoosh - bang' ignition. Improperly hardened frizzens wear out easily, and will in most cases not last more than 100 shots, and then the fun is over.
Ardesa in Spain is one of the companies that manufacture cheap entry level replica black powder firearms. It is rumoured that Ardesa, marketed by Tradtions in the US, has improved their quality in later years. This should especially apply to flintlocks. Ardesa weapons are still cheaper than, for example, firearms from Davide Pedersoli. That being said, I wasn't expecting a quality firearm, but from other shooters I have heard that Ardesa firearms are quite accurate.
I ordered a cheap .45 calibre rifled flintlock Kentucky pistol from the Norwegian Ardesa importer. The pistol was ordered as a kit, which allowed me to shape the stock as I wanted. I regarded it as highly probable that I had to modify a finished pistol either way, so a kit would be perfect. Cheap replicas often have stocks with way too much wood on them which needs to be removed anyway.

The pistol before the stock
forming process began.
At first glance the kit looked ok. The stock was probably beech and large amounts of wood had to be removed. The barrel was in the white, but the brass was polished. The screws were poor quality, but you get what you pay for. The flintlock seemed a bit frail, but it had a strong main spring. Inside the lock it I was surprised to find a screw with a coil spring that could adjust the trigger pull. This was not a historically correct feature. This renders it illegal in MLAIC competitions, but that does perhaps not matter as long as MLAIC does not have a competition for rifled flintlock pistols. The lock was blued, except for the frizzen which was blank. The ramrod thimbles were made of two simple brass pipes which were fastened to the stock and barrel with screws.
Putting the kit together


Before and after removing wood from the stock.
First I had to do was to inlet barrel, lock, trigger assembly, trigger guard and muzzle cap to the stock. This was really not a difficult job, as most of the inletting was done by the factory. The parts did not quite fit, so I spent a couple of hours with the file. When buying a kit I don't complain if I have to remove wood, but it is worse when too much wood is removed from the factory. The trigger guard cavity was too large as too much wood had been milled away. The barrel was secured to the stock with a tang screw and two screws that went through the underside of the muzzle cap and into the barrel. This is in my opinion a poor solution, and I would have preferred a barrel wedge or pins. Undoubtedly this is an economical solution from the factory. Unfortunately, the holes that were bored in the barrel were not properly aligned with the holes in the muzzle cap.

The flintlock.
After all the parts were inletted it was time to shape the stock. I soon found out that I needed a rasp to begin with, continued with a finer file, and finally I used sandpaper. I did the usual process of starting with coarse grit sandpaper, proceeded with medium grit and finished with a fine grit. I then proceeded to polish the stock with steel wool to make the stock as smooth as possible. I did not polish the grip as thoroughly as the other parts, because I don't like smooth grips. When shooting the hands often get greasy and sweaty, and this may cause a smooth gripped pistol to twist in your hands.
Finish
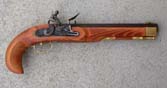
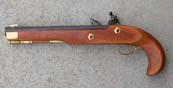
Finished pistol.
I had doubts regarding what oil with which I was going to stain the stock dark. The stock was pretty light, so I used a dark leather dye called 'narvsverte ' to get the dark colour I wanted. The result was pretty good.

The barrel.
The barrel was in the white, so I decided to rust brown it in the style of most original Kentucky pistols. I'm very competent of getting things to rust, but to get a nice and even surface of rust it is a good advice to use cold-bluing liquid. The barrel was coated with oil internally, while the rest of the barrel was degreased. The barrel was then coated with cold-blueing liquid and set aside to rust for a couple of hours. Since the process was a little slow I added some water to speed the rusting process. After 24 hours the rust that was formed on the barrel was lightly polished with fine steel wool and water, and set to rust again. After 24 new hours this step was repeated and the browning was finished. The barrel was then coated with a thin layer of linseed oil to stop the rusting process. The barrel was taken out in the sun to dry.
The first shots
Finally, the day came when I could test fire the pistol. The lock looked ok, and a flash hole liner was installed. The Ardesa flash hole liner is coned from the outside, but I prefer liners that are coned from the outside, such as Jim Chambers's White Lightnin liner. A new and sharp flint was secured by the jaws of the cock, and I was ready.

The flash hole liner.
The barrel was poorly rifled. It was obviously button rifled and the inside of the barrel serrated with marks from the button. I don't know whether this makes any difference accuracy wise, but I would have preferred a barrel that was more accurately machined. The rifling is pretty shallow and has a 1 in 16" twist.

The movie clip is 1.80 Mb.
Some target shooters use FFFFg priming powder as a main charge in small calibre pistols, but when I tried to load FFFFg most of it disappeared through the flash hole when ramming home the ball, so I switched to FFFg. I loaded the pistol with 24 grains of FFFg Wano black powder, a felt wad and a .433" bullet with .015" patch. I was especially interested in the ignition. The first shots were positive regarding ignition speed. The little lock was pretty fast, and I must admit that it surprised me. You can see a movie clip from the first shots here:
Overall impression of the kit
- Positive: A cheap pistol that is reasonably accurate. Fast ignition. The frizzen seems to be properly hardened.
- Negative: Poor screws and fragile parts. Marks from the button rifling inside the barrel.

 About
About Les artikkel på norsk